Fan Art Week
Hi!
I'm going to show everyone my process on how I make my pixel art step by step. Before I start, I would like to say that I use Paint Tool Sai to draw my pixel art and PhotoShop for animations and enlarging my pixel art!
If this is your first time making pixel art, here is some info before you start. Pixel art is usually done on a really small canvas. There are different styles in making pixel art - from really detailed lineless work that has a painterly look, to simple cell shading, to pixel art with flat colors. It all depends on your preference, and that comes from continuously making pixel art. This tutorial will have simple shading and a background with flat colors. What could also help with figuring out your preference is to look at games with pixel art, old or new, and see which style you like the most and try to emulate it.
Step 1: Sketch


I like to sketch my ideas on paper and scan them, but you can make sketches on your digital canvas. The canvas resolution should be 72 dpi when you draw. If you are going to print it out or make merchandise, you should increase the size to 300 dpi. The size of my pixel canvas is 150 x 150 px.
When you start on your sketch, make sure it's a size you like. If a canvas is large, your outlines will look thin; if your canvas is small, your outlines will look thick. It's all based on how you want your pixel art to look at the end. This piece will have outlines; if that's how you want to make your pixel art, this tutorial might help you.
Step 2: Outline Background


I like to start with the outline first for my background, just in case I'm not happy with the position of the characters in the foreground. I can move them without worry once the background is finished. For the outline, I use the binary tool in PaintTool Sai and the pencil tool in Photoshop. I also like to pick a backdrop color and stick with it throughout the piece.
Step 3: Add Flat Colors


Fill your background with flat colors first, and make them similar to the color that you chose as your backdrop. In this step, I chose pink and a warm purple. I also layered the space background a little bit, with two different colors to add depth to the background, because I don't want space to be only one color. If your backdrop color is a dark color, gradually go lighter as you inch toward the foreground. If you have a light color for your backdrop, use darker or more saturated colors as you move towards the foreground.
Step 4: More Detail


The background looked pretty plain before, so I thought I should add a different color. I went with blue since it stands out and works well with the warm purple I have. The background now looks like it has something going on. If you have trouble with colors, try a color wheel or use complementary colors such as red and green, or purple and yellow. Also, the background is lineless; I used to add outlines in the background but I feel like it creates clutter later on when I add characters, so I try my best to not add any.
Step 4: Little Details
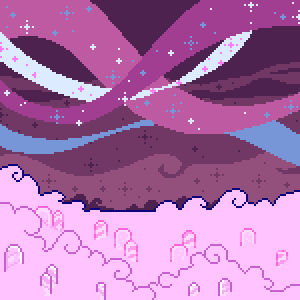

I added little stars with the same colors and little pillars that come out of the clouds.
Step 5: Shading your Background


Shade and highlight your background. This is the last step for the background before you move onto the characters or foreground. When it comes to shading and highlighting, I like to use similar colors based off the flat colors I have already used. For the pink clouds, I went with more saturated colors by using the picker tool and then going slightly darker for the first layer of shading, and even darker for the second layer.
Step 6: Outline Characters and Add Detail
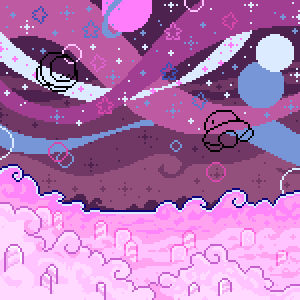

I went back to my sketch to outline the characters. I also added more stars - big and little -, some circles for atmosphere, and a few planets, to take up a little more space in the background.
Step 7: Fill in Characters and Details
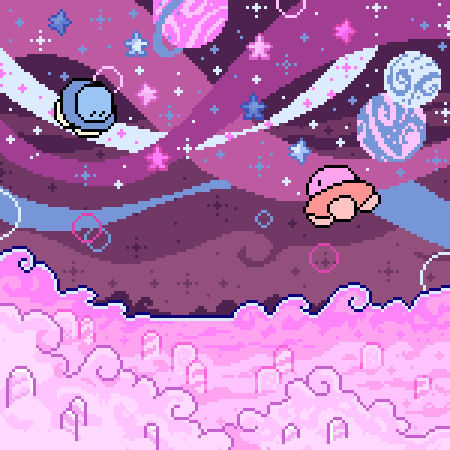

Next, pick some flat colors based off your background - you may have noticed I even used two of the same colors that I used for shading - blue and pink. I used them for the UFO, Kirby, the stars and planets!
Step 8: Shade Characters

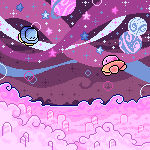
When it comes to adding characters, I still like to use similar colors. But I also use different ones for highlighting; it makes them stand out more. When I'm shading, I go by the base color I used for the character. I do only one layer of shading, maybe a second one if they are taking up more space in the piece, but it's only to define certain areas by giving them depth.
Step 9: Touch Ups (Last Step)


Lastly, I like to color the lines inside the characters to make them look softer. It also causes the outlines to appear darker, which makes the characters stand out from the background. Drawing another white or lightly colored outline around your characters helps them pop even more. It's not always necessary, but sometimes it's a nice touch. And don't forgot to sign your art!!
Bonus: How to Enlarge Pixel Art on Photoshop


If you have Photoshop and you want to enlarge your pixel piece, this is how you do it. Go to Image Size, change the Pixel Dimensions from Pixel to Percent. ONLY go by even numbers such as 200, 400, 600, etc. This will help preserve the pixels and won't slightly stretch them if they are enlarged (see the example above). You can also go by pixels, but they have to be multiplied by even numbers as well, i.e. x2, x4, x6, etc. At the bottom, the setting has to be at Nearest Neighbor - to help you find it: the default is Bicubic Automatic.


![[AT] Puffrym by faundly [AT] Puffrym by faundly](https://images-wixmp-ed30a86b8c4ca887773594c2.wixmp.com/f/f9dfb4ba-851c-4b5f-b6f7-2b40e34b32c6/d9uuhmm-e43cf0b6-6739-422f-861e-66c05904c5c2.png/v1/fit/w_300,h_600/_at__puffrym_by_faundly_d9uuhmm-300w.png?token=eyJ0eXAiOiJKV1QiLCJhbGciOiJIUzI1NiJ9.eyJzdWIiOiJ1cm46YXBwOjdlMGQxODg5ODIyNjQzNzNhNWYwZDQxNWVhMGQyNmUwIiwiaXNzIjoidXJuOmFwcDo3ZTBkMTg4OTgyMjY0MzczYTVmMGQ0MTVlYTBkMjZlMCIsIm9iaiI6W1t7ImhlaWdodCI6Ijw9NjAwIiwicGF0aCI6IlwvZlwvZjlkZmI0YmEtODUxYy00YjVmLWI2ZjctMmI0MGUzNGIzMmM2XC9kOXV1aG1tLWU0M2NmMGI2LTY3MzktNDIyZi04NjFlLTY2YzA1OTA0YzVjMi5wbmciLCJ3aWR0aCI6Ijw9NTQyIn1dXSwiYXVkIjpbInVybjpzZXJ2aWNlOmltYWdlLm9wZXJhdGlvbnMiXX0.m0GqCLXrUxcqKQgcPMXuIeZN-__EJynnJ957gjzUJkU)


![[AT] Boyy by faundly [AT] Boyy by faundly](https://images-wixmp-ed30a86b8c4ca887773594c2.wixmp.com/f/f9dfb4ba-851c-4b5f-b6f7-2b40e34b32c6/dans0at-e9bc8755-9ad8-4b10-bc7b-3ad9a92868ad.png/v1/fill/w_85,h_139/_at__boyy_by_faundly_dans0at-fullview.png?token=eyJ0eXAiOiJKV1QiLCJhbGciOiJIUzI1NiJ9.eyJzdWIiOiJ1cm46YXBwOjdlMGQxODg5ODIyNjQzNzNhNWYwZDQxNWVhMGQyNmUwIiwiaXNzIjoidXJuOmFwcDo3ZTBkMTg4OTgyMjY0MzczYTVmMGQ0MTVlYTBkMjZlMCIsIm9iaiI6W1t7ImhlaWdodCI6Ijw9MTM5IiwicGF0aCI6IlwvZlwvZjlkZmI0YmEtODUxYy00YjVmLWI2ZjctMmI0MGUzNGIzMmM2XC9kYW5zMGF0LWU5YmM4NzU1LTlhZDgtNGIxMC1iYzdiLTNhZDlhOTI4NjhhZC5wbmciLCJ3aWR0aCI6Ijw9ODUifV1dLCJhdWQiOlsidXJuOnNlcnZpY2U6aW1hZ2Uub3BlcmF0aW9ucyJdfQ.BIr4z-WRc94F95AfUgUOMmF5tdNhSo9bc0WLHyCojK4)


